Sunday, October 20, 2019

A Powerplant and a Tiny Drunken Man


After getting the engine all together and prettified in the last installment of this fine public service known as my blog, I started to test fit it. It very quickly became apparent that the engine was too far back. I had already modified the transmission crossmember in anticipation that the engine would need to move forward, but it needed to go yet another inch forward. So again (for the fourth or fifth time) I busted out the angle grinder to modify a crossmember for this car.

Cuttin' and grindin' as I am wont to do
Another inch forward
Tacked in
All welded up
Once the engine was in place, I started looking at motor mount options. Ideally I wanted to re-use the big chonky motor mount absorbers I had used with the 4-banger, but there was a distinct lack of space on the driver's side. The more I stared at it the more I knew that there was a perfect option for engine mounting. TCI, the supplier of my suspension kit, makes a motor mount that was an exact fit, and I knew this because I had a set at one point. That's right TCI provided me with a set of motor mounts that were exactly what I needed for this swap and I threw them away at some point. Well I didn't exactly throw them away, I re purposed the bushing, put the rest of the mount in a box, and then threw that away at some point. This is all to say that I had to spend good money on something I already had, and then threw away. I am so smrt.


Now that I had the mounts in hand for the second time, I could weld tabs to the crossmember (there had previously been tabs, but I cut those off as well.

Lots of space on the passenger side.
Not so much on the driver's side. I think I'll be using a different
power steering hose, this one is too close to the motor mount bolt.

A Small Block Ford in it's natural habitat
Not a lot of hood clearance but it should be sufficient.
Bolted up the accessory brackets, they are not that photogenic.

Steering/motor mount clearance

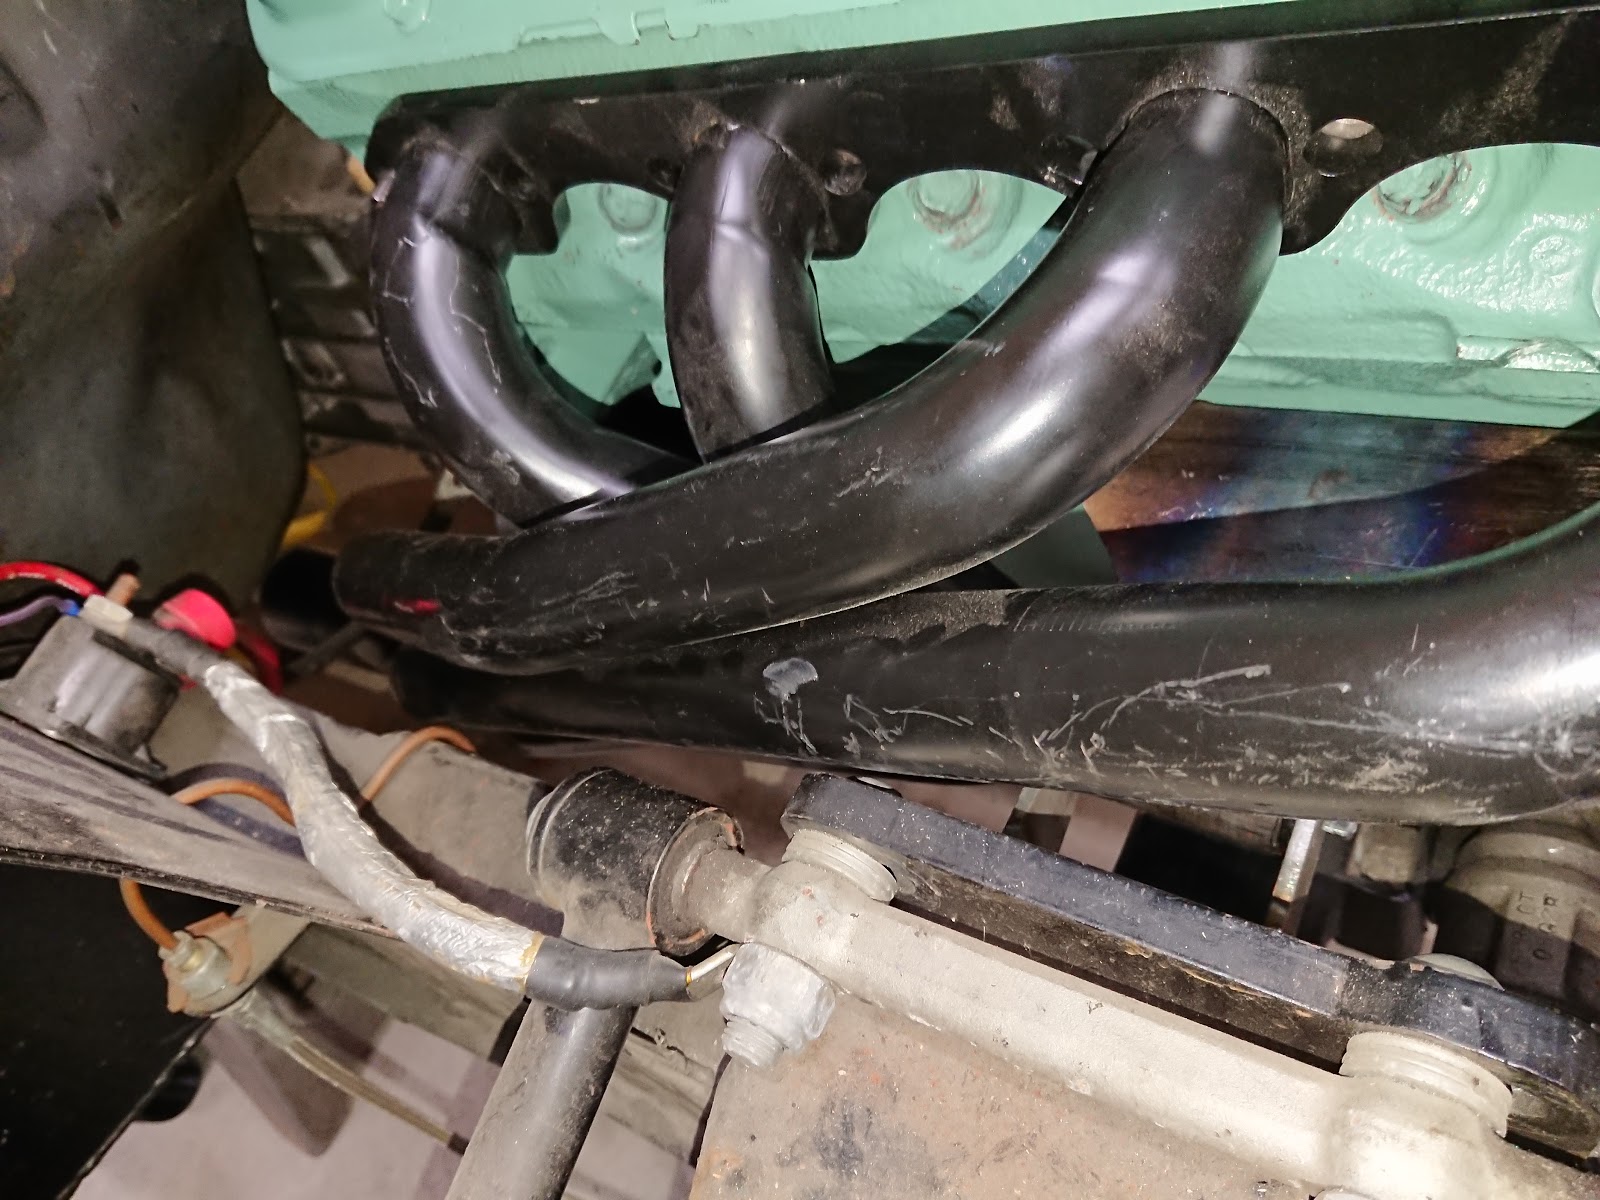
Now when I said there was plenty of room on the passenger's side, I meant there was plenty of room so long as there were no headers in place. There might even be plenty of room if I had used headers appropriate for the application but in classic Jesse fashion, I decided to make it hard for myself. These headers are for a 94-95 Mustang 5.0. I bought them because I wanted long tube headers, and didn't know of any for this specific motor/suspension/steering combo. Also I wanted the thickest header flanges and tubes I could find, and I wanted it all under $300. These fit the criteria and I figured if they needed modification, I could figure that out.

So back to the passenger side... The passenger side motor mount bolt and nut interfered with one of the tubes. I trimmed back he bolt but there was still some interference. With confidence given me by an episode of Engine Masters, I busted out the ball peen  hammer and made some room.

Look ma, I'm a fabricator!
the corner of the A-arm mount also needed a little room

The driver's side header had technically had clearance but is a huge pain in the butt. The whole area is really tight between the header, motor mount, and steering shaft. To install this header, the motor mount has to be unbolted from the frame and loosened from the engine block, while the driver's side of the motor is lifted by a jack or hoist. The header can then be set in place, but not bolted up. The engine is then lowered into place and bolted up, after which the header can be bolted down. It's a really fun thing to do. 


With all the accessories bolted up, we get an idea of what the finished product will look like. I think the accessories would look better mounted lower, but they'll perform just fine like this. In reality, having good solid OEM engineered accessory mounts should make for a pretty problem-free belt drive.

This right here is the money shot. It's what you came for, so soak it in.

With the moving forward of the powertrain, this meant I had to replace my beautiful aluminum driveshaft with something a little longer. I was not prepared to pay the price for another aluminum shaft and found a good deal on a steel shaft. Sadly, it's probably triple the weight.

52" driveshaft
Installed.
Recently a good friend of mine has gained an interest in garage work. He's a ton of fun but not conducive to getting a lot done. He is very enthusiastic and observant, he'll try anything he sees me do, but is in constant danger of killing himself. I think it's a bit like having an eager but ever-inebriated assistant. 


Keep an eye out for more updates in the next few weeks, I've been chipping away at a few other items.

Tuesday, August 13, 2019

Alpine Green

I don't have a lot to catch up on (as far as the blog is concerned) but there's enough here in eye-candy to post. Last time, I cleaned up the crusty dumpster that is my engine, and had the heads rebuilt. Today you get to see it go back together. It's a satisfying post at the very least. But first, let's finish tearing the engine apart.

The five-oh being as crusty as it is, the timing cover was an absolute unit to remove. Two of the bolt heads twisted right off. I eventually found that this was because the bolt shanks had rusted and expanded, wedging themselves tight in the timing cover holes. Getting them out was a fun hour and a half. Coincidentally, an hour and a half is on the longer end of the typical wrenching session these days, so progress is glacial.


With the timing cover off, it could pull out the stock camshaft. The explorer cams are notoriously mild, which makes sense. They were designed to shuttle would-be pretentious suburbanites to and from the Eddie Bauer shop (and the Olive Garden!) at the new shopping mall, in their Eddie Bauer branded chariot, while listening to the latest Michael Bolton album and threatening to confiscate Zackery's Sega Genesis if he didn't stop pestering Britteney. So of course Frank and Barb wanted a nice smooth idle, and Ford obliged by giving them camshaft with 190/200 duration at .050" and only .450" lift. And Frank and Barb loved it, at least until the divorce, when Barb took the 1996 Eddie Bauer Explorer in Evergreen Frost Metallic along with Frank's golf clubs which were in the back. Frank still can't prove that Barb took them, but she did. And she sold the set at a pawn shop for 35 dollars.  The driver cost Frank four times that, in 1994. Zackery was prescribed Ritalin shortly after the divorce, who could have seen that?


I ended up going with a Lunati VooDoo camshaft, all thanks to a Hot Rod article. Duration is 221/229 at .050" with .549"/.550" lift. It's a very mid-range camshaft, that should peak right around 6000 RPM, and hopefully make near 340 HP at the flywheel.


Thankfully this cam is a roller cam, so I don't have to worry about wiping out a lifter and wrecking the cam during break in. I've never had a flat tappet engine and have no experience with that kind of thing but it sounds pretty stupid. That's right baby boomers, flat tappet cams are stupid, and you never hopped a Coke can with your Chevelle!


While I had the timing cover off, I decided to install a new timing chain. It is adjustable, so I can advance or retard the cam timing by a few degrees if I really feel it's necessary to move the torque curve up or down the RPM range.


After installing the head bolts, I remembered that the lower head bolts go into the coolant passages and need sealant. So I got out my trusty MAP gas torch and attempted to melt out the grease I had previously applied to the threads. Not sure if it worked, but an attempt was made.


Once I got the heads installed I could finish setting up the valvetrain. After assembly I quickly found out that there was a lot of extra lash between the rocker arms and the valve tips. They were looser than Barb after a few post-divorce margaritas. I am new to pushrod engines like this Small Block Ford, so I had to do a little research. It turns out the Lunati camshaft has a .200" smaller diameter base circle than stock. This allows the cam lobes to have more lift and still fit inside the cam bearings.

The fix for a reduced base circle cam is longer pushrods. I picked up a set of +.100" pushrods to take up the slack.


Now I could button it all up. Here's to hoping that I don't have to open it up again for a very long time.


After taping off the orifices, the color could finally go on. I was looking for an old school industrial look to offset the bling of the stack intake. I also thought a subdued green hue would pay homage to the Little Green Monster from which the original engine swap came. Detroit Diesel Alpine Green checked all the boxes, so on it went.


I couldn't be happier with the color.


*** BONUS CONTENT ***

For the first five years I had my dear old welder, Joan of Arc, I didn't have a garage to store/use her in, so I stored her in the living room and carried her out to the carport a couple times per week. Now I have a garage as well as a wife, so no more living room welder storage. But now that I have a garage, it makes sense to have a welding cart. I figured I would save a little money and repurpose an old file cabinet. This is just a for cabinet with an angle iron frame around it and casters on the bottom. The casters were the most expensive part.


Jen says I need to paint the welding cart a solid color. I'm thinking black, unless anybody has a better idea.

Sunday, May 5, 2019

The Rushing of Great Winds (or the Creature from Arby's Dumpster)

In my last post I mentioned that when I saw the exterior condition of my new 5 liter engine, I almost returned it. Now that I’ve dug deeper into the engine, returning the engine probably would have been the smart thing to do.

I had intended to have a nice easy swap. Clean it up, slap on some performance parts, and call it a day. The clean up definitely took longer than expected. The engine block and heads were greasier than an Arby’s dumpster, though the rat population was probably lower, a thing I was grateful for. I scrubbed wire brushed and decreased for what felt like several days, and then brought it back into the garage.


While significantly cleaner, it was still filthy. I looked it over and realized that this engine had a thin candy shell layer of rust scale over the whole thing. I’ve dealt with rust before, but scale like this is another of the wonderful things about aquatic environments like Michigan. Because of this, I became acquainted with a tool I never knew before. This magical tool is called a needle scaler.


After some work with the needle scaler, the block was not fully clean, but clean enough to proceed. Because I'm adding a much more aggressive cam, and hope to make power for another thousand RPM beyond the stock redline, it was necessary to change the valve springs. Though I know I should be using a "3/4 race cam" so that my Falcon could "hop a coke can" and "tape a hundred dollar bill to the dash and give it to anyone who could grab it while I accelerate", I was tipped off to the cam (actually my whole engine plan) I'm using by this article from Hot Rod. It's a Lunati Voodoo 272/280 cam, which should have good driveability and pull strong until 6000 RPM. While it's popular in the hot-rodding world to have a big cam for a "lumpy" idle, I prefer to have a car that doesn't drive like crap 90% of the time because it surges and bucks at low speed and will barely idle at 1500 RPM.


I ordered a set of valve springs from Alex's Parts because they have a setup specifically for explorer engines that are getting a more aggressive cam. I had planned to change the valve springs with the cylinder heads attached, so I took out all the spark plugs


Some of the spark plugs were non-compliant, so I subjected them to an overwhelming display of force, brought to you by DeWalt. They quickly complied.


With the spark plugs out, I could insert my home-made cylinder inflator which provides a supply of compressed air through the spark plug hole. This would, in theory, apply force on the intake and exhaust valves up so that I could compress the valve springs and remove the retainer. At that point I would replace the spring, retainer, and keepers with the new, higher performance version from Alex's Parts. And this is what happened on the first cylinder.


On the second cylinder, the process did not go as planned. When I hooked up the cylinder inflator to the air compressor I heard the rushing of great winds. And when I compressed the spring, the valve went down with the spring. I soon noticed that the great winds were not a force of nature, but the ghost of a 302 escaping out it's exhaust valves. Now in a fantastic mood, I removed the cylinder heads and shined a ridiculously powerful flashlight in the exhaust port. The light was easily visible through the burned valves.


As I checked the other valves, I found another valve that was not sealing. I didn't bother checking the other head because I knew at that point that both heads needed a valve job.


This left me highly irritated. I had once already considered return this engine on account of it's poor exterior condition. By this point I was outside warranty, so returning wasn't even an option. I had also paid an extra $200 for this engine because it had GT40 heads. Had I purchased a GT40P headed engine, I could have saved $200 on the engine, $300 on the head rebuild, and $150 on the springs and been at least halfway to a really nice set of aluminum heads, or 90% of the way to cheap aluminum heads.  I rolled the dice on this engine and lost. I always thought Yahtzee was a stupid game. Sending this engine to the Arby's dumpster where it belongs started to sound more appealing.

As irritating as all this is, dwelling on it doesn't get me anywhere I found a local guy to rebuild the heads. It seems like a decent job, the only complaint I had was that I had to pay an extra $50 for one o' them fancy 3 angle valve jobs. It felt a bit like getting charged extra for  "unleaded" gasoline. Does anybody even still do single angle valve jobs?? There are cutters that do all 3 angles in one pass!


I had initially planned to have this guy "set up" or measure and shim my valve springs to put them at the right installed height. After looking into it, I found I could buy the tools and parts to do it myself for about the same price as paying him to do it. And when that's the case, the answer is always to buy the tool!


It took a while, but I measured all the spring heights and it turns out only two of them needed shims. The valve heights were all surprisingly consistent, so I hope that is an indicator of careful machine work.


Hopefully I'll soon find the time to finish cleaning up the block, so I can paint it and start on the motor mounts.

Since the last post, I also made some progress on making the garage a good workspace instead of a hoarder's hideout. Some quick work with the chopsaw and a bit of 2x lumber yielded a workbench.


A little more work, and I had a 14 foot workbench. It's not fancy or even flat, but it's adequate for the work I do.


The garage buddy approves.


He's not the only one who is excited to drive this car.


In the past weeks I've had a few nights to work in the garage after the garage buddy goes to bed (he's not actually a very good garage buddy, I have to constantly keep him from killing himself. I think that's mostly what parenting is...)  I'll keep taking these hour and a half baby steps a few times a week and eventually, maybe before the summer is gone, I'll drive this old heap.