Monday, March 30, 2015

All These Buckets of Rain

WORLDSTAAAAAAR!!

That's right, party people, I'm back! I understand if you think I've been slacking. I haven't written an update in several weeks. Maybe months. But who's counting (besides Scott)? In reality I have been giving Grace my attention whenever possible.

After agonizing about which radiator and intercooler to use for at least three weeks, I finally settled on an aluminum radiator for a 1964 Mustang and an eBay intercooler that would fit around the Mustang radiator. Let the record show that a radiator from a 1964 Mustang will fit into the front of a 1962 Falcon with only minor trimming of the lower core support. There is a pinch weld that interferes with the lower tank which can either be trimmed off or bent out of the way using the Clarkson method.


The Clarkson Method (may he rest in peace)

I'm relatively certain that the radiator install was the simplest job I've completed on this car to date. It was almost like a normal car repair where you just remove an old part and then bolt in a new one. I've almost forgotten what that is like. Then, with a quick zip from the 3" hole saw through the core support for the inlet and outlet, I installed the intercooler.


Due to the somewhat unique engine install, I wasn't very confident I would be able to find rubber hoses that would suit my application. So rather than messing around with parts counter people, begging to see their hose collection, I decided to make metal coolant pipes with silicone couplers on each end. Once I had paid way more than I expected to for pipes and couplers a gigantic box showed up on my doorstep filled with not 76 watermelons, but a collection of hose clamps, madrel bent stainless steel and aluminum pipes, and silicone couplers. 

Stay with me for a minute while a take a small detour. I feel a need to air a grievance while providing education for the masses. I find that it is a very common thing for car enthusiasts to confuse silcone and silicon. Silicon is used in circuit boards and as an alloying element in metals. It is a hard brittle substance. Silcone is a rubber like compound used for caulking your bathtub, attracting the attention of men, and connecting intercoler pipes together. Learn and understand the difference so that you don't sound like an idiot. End rant.


Back on topic, I cut the pipes using my grinder and a cutoff wheel or a chain style exhaust cutter. Luck was on my side because the pipes went where I wanted with minimal trouble. I then tacked them into place with my MIG welder.


"


Thanks to my former manager Dan, we have a program at work called Tech Days where one day each month after work, we are allowed to use the shop at work for personal projects. This month I chose to weld up my pipes using the TIG welder at work. You can see from the photos that I'm a far cry from a great welder, but I'm happy with the result. Unfortunately I missed one of the parts when I placed my order so the turbo to intercooler pipe will have to wait.

COLD AIR INTAKE GOOD FOR +50 HP AND 6-7 MPG! DOUBLES YOUR VTEC!

intercooler to throttle body pipe

Stainless Steel weld, slightly too hot. The weld should be a gold and blue tint
Upper and lower coolant pipes
Cold Air Intake mount point
Intake from fenderwell
 I also decided to provide a solid mountig for the intercooler by welding tabs on each side and attaching weld nuts to the back side of the core support to mount my intercooler.

Tacked in place on the other side
Preheating with MAP gas
Welded
Cleaned
Fits just right
Last week I had the chance to go shopping at one of my favorite places, the wrecking yard. I got the chance to introduce my buddy Bret to the joys of wrecking yards. When I was in high school, one of my favorite time killers was to wander the wrecking yard and learning which engines game in which cars and which parts would interchange between them. The more I've learned about building cars and fabricating, the more I've realized that all parts can interchange if you believe in yourself and are handy with an angle grinder.

Parts from a Ford Ranger, Ford Taurus 3.0, Ford Taurus 3.8, and Chevy Suburban, all bound for the same Ford Falcon
#SWAGFORDAYS
Chevy Suburban Coils (LSx coils) mounted on a Ford Ranger valve cover

LSx coils and stamped steel valve cover on the Falcon
Chevy LSx igntion coils are notoriously strong and have a built in ignitor, making them easy to control from a Megasquirt ECU, so I was pretty stoked to find them for $35 at the wrecking yard. I was also excited to find a stamped steel valve cover from a Ford Ranger to mount them on. I've decided to remove the cast aluminum valve cover that I've  had on that engine for about 10 years and use the stamped steel unit. It will be more practical and help achieve the pseudo OEM look I want for my engine. At the wrecking yard I also found a 130 amp alternator from a Taurus and an electric fan reported to be a popular uprade for vintage mustangs.

In an attempt to keep this Falcon easy to service, I've tried to incorporate features to simplify assembly and dis-assembly. The new 130 amp alternator required a wrench on each side of the bolt the holds it in place as well as a wrench to tension the serpentine belt, making the whole process difficult as it requires 3 wrenches and 3 hands. Instead of receiving a controversial 3rd hand transplant, I made a nut for the back side of the alternator that would reduce requred hands and wrenches from 3 each to 2 each.


I feel like I've been seeing real progress in the past few weeks, as well as spending ridiculous amounts of money on odds and ends. And while it may look like I'm getting really close, there is still a ton to be done. This is what my recently made to-do list looks like. Mind you, this is only what is required to get the car on the road, not what it needs to be fully functional.


So yeah, I've got my work cut out for me. I'll just take it a bit a at a time and eventually I'll get there. On that note, I'll leave you with a hot rod I recently built completely in the space of one evening.


Wednesday, February 18, 2015

I don't care if it's 7 in the mornin', for all I care it could be the Second Coming

It's that time of year again... Last week I worked 68 hours, the week before was 60, and the week before that was 73. It's the end of fiscal year and I am cramming to analyze data and finish reports. So I think it goes without saying that I've not been getting any work done on Grace. To be honest, I've not been getting any laundry done. So here I sit in my last pair of clean underwear, dear readers, at 11 PM, writing this for you. And sadly don't really have much to say. But I do have a video of some Ozzies in a Falcon doing the Lord's work.


In closing, there is no room in my bedroom because it is full of car parts, never trust a person who doesn't like pizza, and always keep it rubber side down.

Thursday, January 29, 2015

I'll Be What I Am


The Unstupider, Revisited

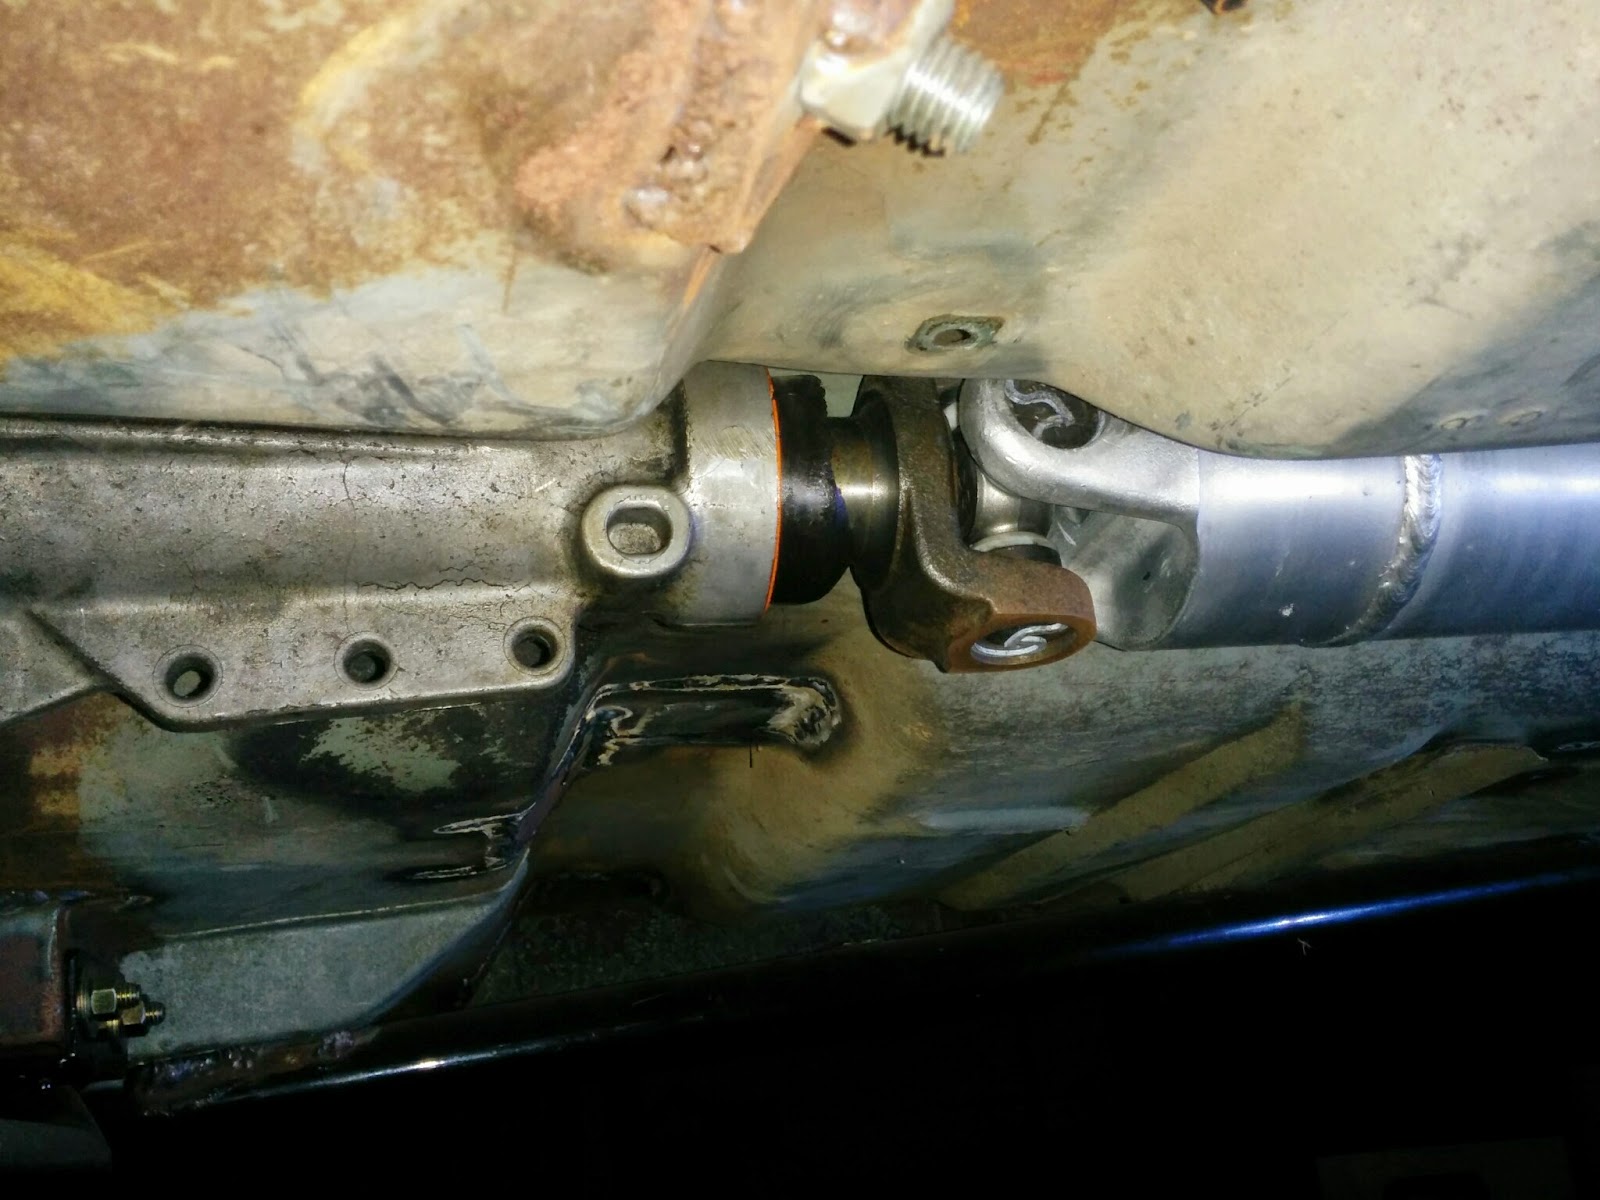
If you've been following along, you will remember that I'm an idiot. The reasons are legion, for they are many, but in this case I'm referring to the time when I measured wrong and had a driveshaft shortened about an inch too short. I then found a spacer for the driveshaft to take up the slack, but luck was not with me that day. The spacer, which I called the unstupider, did not fit my pinion flange since the Mustang 8.8 axle has a different pinon flange than the Explorer 8.8 pinion flange. After a lot of interneting I found that Fabtech makes a spacer for the F-150 and someone listed it as applicable for the Explorer as well. I rolled the dice and went to 4-Wheel Parts in Compton (yeah, that Compton, where you get shot while eating BBQ or doing drug deals) to get one. Turns out they didn't have one in stock so they would have to order it in and then ship it to me. So I went on my way, expecting to get a package on my doorstep in the next few weeks. That was in September. It is now almost February. To be honest I kind of forgot about it, and every time I remembered, I got angry that I had not yet received the Unstupider 2.0. So finally I called 4-Wheel Parts, ready to shoot someone (while eating BBQ) and they said "Uhhh, yeah we have that in stock. We don't know what happened. You can come pick it up."  So at lunchtime I had some hawiian BBQ and decided not to shoot anyone so long as they had my part. When I showed up it was on the front desk. They smelled the BBQ on my breath, cowered a bit, and handed me my part. When I finally made it home that night around 10:45, I climbed under the car to check if it fit. Fortune was not just with the weaklings at the counter of 4-Wheel Parts, but it was with me as well because the Unstupider 2.0 fit. Fate had smiled upon me.


Before spacer installation
Problem: solved

Intermission


Mild Steel or Spicy?

After spending months working on my intake manifold which may or may not work because welding aluminum is a pain in the arse, I finally switched my welder back over to steel. That right there is reason to rejoice. I got back to what I was working on when before the manifold, namely seat brackets. When I first installed the Miata seats I just kinda stuck them in and welded a reinforcement plate and nut on the underside of the floor pan. I still had not finished the rear mounts. I decided to redo the whole thing and redo it right. These seat brackets are incredibly solid and would hold the likes of Rosie O'Donnel if she could fit through the door.

Patching up the old mess I made
Reinforcement plate
Bracket tacked in place
The "Equal Opportunity Seat Bracket". Welcome to my car, fatties! 
Passenger side finished

What's Fresher than being Fresh??

In closing, I just want to share something different with you. This is the two year anniversary of me finding Grace on the Inland Empire Craigslist (the finest in all the land, for real though). Two years ago I was in Timmins, Ontario, Canada, and tonight I am in that same blessed frozen wasteland. I found Grace while browsing craigslist between cold start tests on a prototype of what is now the Lexus NX200t. It was also the first time I had ever used a bidet, and most certainly the first time I had ever used a computer controlled toilet seat. So in memoriam, here is the control panel of that computer controlled, heated, amazing toilet seat/bidet combo. May you, dear reader, some day be fortunate enough to experience such goodness.


Thursday, December 18, 2014

She was built with a brain and some swagger

If you follow this blog (and I know that there are at least four of you that do) I'd forgive you for thinking that I'd become a deadbeat and given up on the project. But before you drag me to court to pay alimony for shirking my building/blogging responsibilities, let me present photographic evidence in my defense.

Truth be told, I've been dedicating a ton of time to a piece that I feel will set this build apart from everything else out there. Of course being set apart from the crowd can be a very bad thing (think Pontiac Aztek or asparagus ice cream) so I was going for an improvement over the current situation as well as something a little different.

Lets go back in time a few months to the day that Tim helped me install the engine. So now I'm doing the math in my head and that was way longer ago than I thought it was, in fact that was six months ago. I guess time flies when you're getting old. Back on topic, I had built the motor mounts with just a bare engine block for mock up so when I installed the engine, I came to find that the intake manifold would interfere with the brake master cylinder. This left me with two options: either make new engine mounts and move the engine forward an inch, or build a new intake manifold that would clear the master cylinder. Of course since my life's mantra seems to be if it's worth doing, it's worth doing the hard way, I couldn't not take on an intake manifold fabrication project.

This was the problem area, the upper manifold would interfere with  one of my master cylinders
Once I decided that I had to make a manifold I got right to work with my ever helpful cardboard. I wanted to see what size plenum I could fit in the engine bay without purchasing the material. For those not familiar with the term Plenum, it's kinda like the dentist's waiting room where the intake air hangs out until the door (valve) opens up and it can go down the hall (runner) to the room (cylinder) where it will be picked at with pointy metal things and violently flossed and scolded by a dental hygenist (ummm... mixed with fuel and ignited?). I found that the Falcon had room for a 5" OD plenum, or so I thought. Plans changed as the project progressed, but I'll get to that in a bit. 

Most intakes have a throttle body at the end, or in the center of the manifold, but as you can see in the picture below, having it at the end was not possible and as much as I hate to admit it, the only reason I didn't go center mounted was that I couldn't stand the aesthetics of a center mounted throttle body on this type of manifold. In the picture below you can see my plan for an angled throttle body entry (minus a few vital parts).

See, just like a dentist's office!
Once I'd made some plans (in my head) I started ordering all the pieces I thought I might need. I also began researching how to MIG weld aluminum as I'd only done this once or twice before and the outcome looked like an aluminum version of Gettysburg. While watching a YouTube video comparing aluminim MIG vs aluminum TIG (trust me, I'd use TIG if I had access) I was introduced to Rockmount Nassau's Neptune wire. The author of the video seemed to think it was magical wire, particularly good for non-ideal welds. By non-ideal I mean dissimilar alloys, possibly dirty or oxidized materials, and low operator skill. Since I could check all of those boxes I decided to check it out. 

I called Rockmount Nassau and this nice lady named Peggy or Betty (or one of those names you would expect a receptionist at a welding company to have) connected me with their engineer. The engineer whose name I have no recollection of was very friendly and was willing to discuss the unique challenges of my project. He told me that since I was welding a cast flange to a 6061 tube, Neptune wire would be my best choice. He could have just said that to make a sale, but I chose to believe him. This was a roll of the dice because normal welding wire is about $10 per 1lb roll, and this magical wire has a magical price. My minimum order was $100 so I ended up spending $150 for two 1lb rolls. Magical wire indeed...

manifold ingredients
Ford 2.3 Turbo inline intake found on 83-86? TurboFords 
Surgery begins, the indent on cyl #1 can't be helping things...
I've mentioned before that I have a bit of a third world fabrication shop setup, but I'd like to take a moment to remind you that this entire manifold was fabricated on a kitchen chair. My tools were a drill with various bits and hole saws, a hacksaw, a die grinder with carbide burrs, and a MIG welder. Moral of the story: being stubborn is probably the best tool you can have in your box.

Cutting precise holes with my 3rd World Bridgeport.

HuRR DURR! I CAN FABRICATIONS!

Remember the part about the Civil War War of Aluminum Aggression? Well my first few beads looked about the same, and you can see them in the photo directly below. When my roommate Vaughn saw this he burst out laughing. In a desperate attempt to salvage some diginty, I challenged him to break these welds. He leaned one end on the concrete and the other end on a Big Block Chevy cylinder head which was sitting on the ground. He hit the middle of the ugly welded tube with at 4lb sledge three times before it broke. I felt vindicated, and more importantly, convinced that the magical wire really was magical.

HURr DUrR! I CAn WLEDiNG!
Something you'll learn about welding is that sharing pictures of your welds is a lot like being a preteen girl who uploads a YouTube video of herself singing. Unless everything about it is absolutely flawless, people (most of which have never laid a bead of aluminium in their life, or sang a cover of Never Getting Back Together, as the case may be) will tell you how bad it sucks, that you are a failure, that your eyeshadow makes you look like a zombie, etcetera, etcetera. Well I got something to say to you, haters. I AM BEAUTIFUL! AND SPECIAL! MY MOM SAYS SO! AND YOU CAN'T MAKE ME AFRAID TO SING AND SHARE IT WITH THE WORLD! 

Now that I've got that out of the way, as I mocked up the runners and plenum I found that if the runners curved up, there would not be room for a fuel rail. I'd never seen the intake on a Ford 2.3 turbo curve down toward the block, but it seemed like a good idea. As the manifold progressed, I began to like this idea more and more. It will create a very unique look on this engine and should also improve airflow since the intake runners will have at least 44% more cross sectional area vs stock.


In the following two pictures, you are looking down the #2 intake runner. The faint D-shaped outline around the runner indicates the actual intake port size. The stock intake manifold is significantly smaller than the port. I opened the runner with a die grinder and carbide bit to better match the intake port size.

Shortly after beginning to grind
Finished runner

If you were previously confused by my rambling about the throttle body entry, perhaps this will clear things up for you a bit. I welded a 3" tube off the side of the plenum at an angle so that it will go around the power steering pump. Intercooler piping will hug the driver's side of the engine compartment.


Inlet tube transition
Runner transitions smoothed, but this revealed several large gaps
So I welded them shut
So smooooove


Almost completed Ford 2.3 Turbo custom intake manifold 
At this point the intake manifold is about 90% completed. I plan to trim the inlet tube about 3" and attach a throttle body flange, as well as a few brackets and bosses, and smooth the welds. Additionally, I will have to fabricate a custom fuel rail. Once this is all finished and I've actually run the manifold on the engine, I will remove it and give it a nice thick coat of wrinkle black paint to cover my transgressions.

And that, your honor, is why I believe I should not be paying alimony.

Author's note:
I had intially intended to wait until the manifold was completed before writing this post, but it had been almost three months since my last update. Also, seeing that I'm sitting in a hotel in Snorewich Connecticutty and by the time I get back to California I will have been on the road almost a month, I decided I needed to write. It's been far too long. YOU DESERVE THIS, DEAR READERS! ALL FOUR OF YOU! (It would also be rad if you subscribed)

how to DIY custom intake manifold ford 2.3 turbo 2300 Merkur SVO mustang turbocoupe xr7 Ranger pinto esslinger bo-port TurboFord